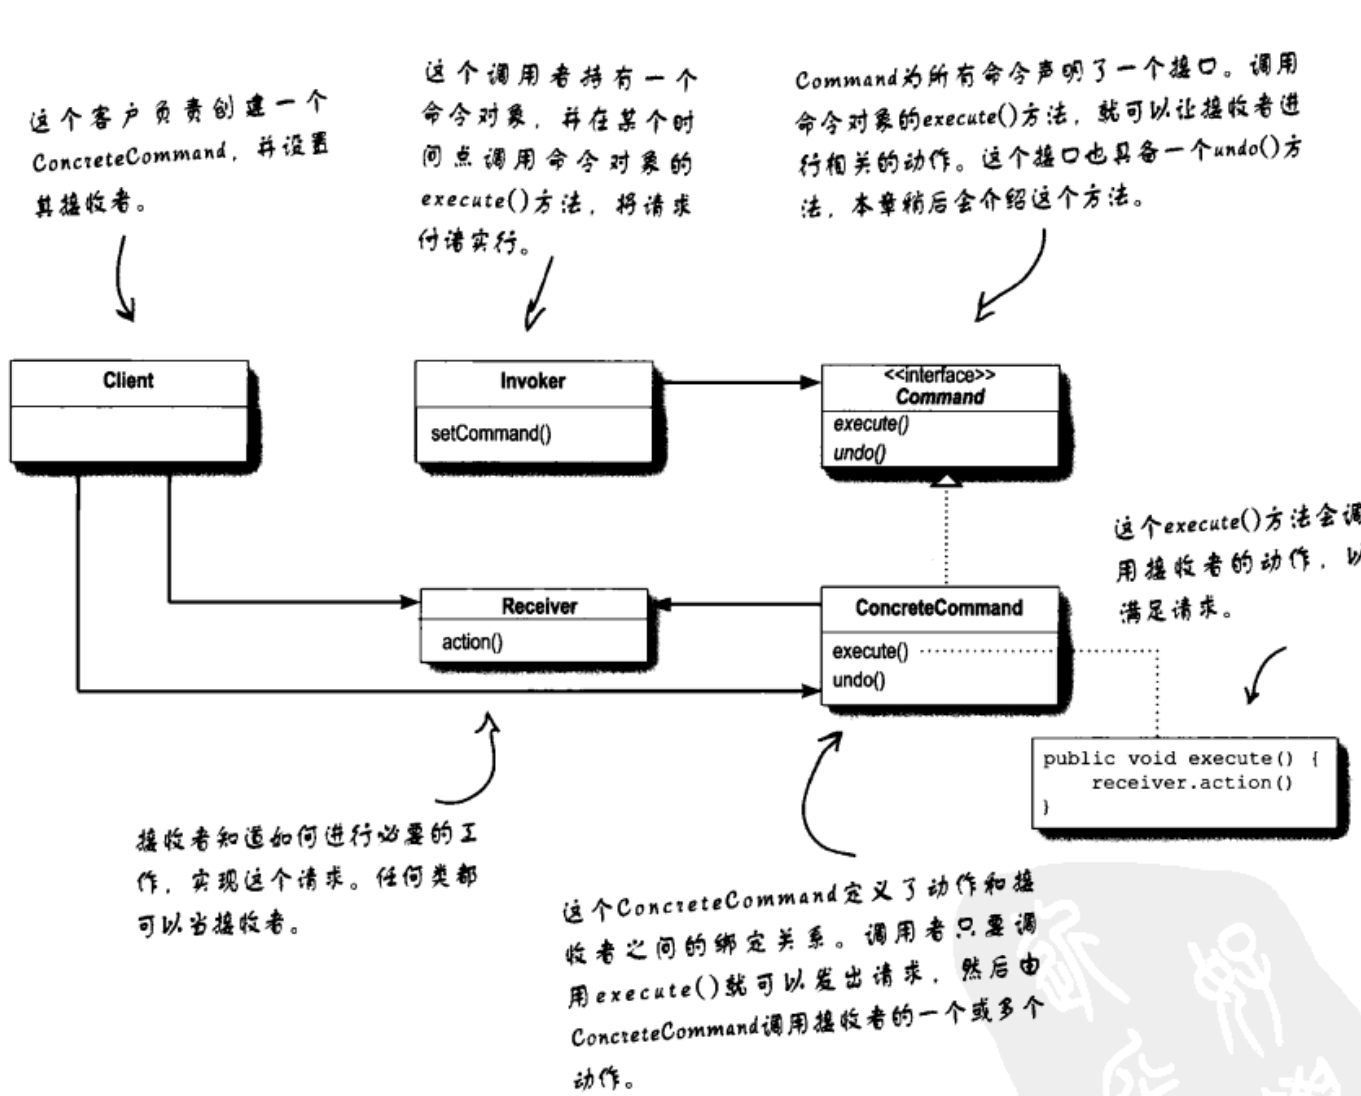
命令模式通过封装「命令执行者」和「命令执行者的一个或一组操作」,将命令的发出者和执行者解耦。
用《Head First》的餐厅例子来帮助理解「发出者和执行者解耦」:
餐厅中,服务员负责记录顾客的点单,厨师接收服务员记录好的订单然后制作餐食。其中,服务员是命令发出者,厨师是命令执行者。
服务员不需要知道餐点的具体制作方法,只需要记录订单并给厨师传递订单;厨师也不需要管服务员如何记录订单,她只需要拿到订单并按照订单上的餐点制作食物。两者各司其职,更换任意一方不会影响整个流程。
「命令执行者」是厨师,「命令执行者的操作」是制作各餐点,「命令发出者」是服务员和订单。
一个现实世界无处不在的设计模式。现代社会的分工合作。
问题场景
一个远程遥控器(命令的发出者 invoker)可以控制家用电器(命令的执行者 receiver)。
比如卧室顶灯的开关。按下遥控器的 on 键就能打开卧室顶灯,按下遥控器的 off 键就能关闭顶灯。用户可以自定义各按键的功能,你甚至可以让 on 键关闭顶灯,off 键打开顶灯;或者指定房间,传递房间 id 为参数,实现按下 on 键打开客厅的灯或者厨房的灯。
还是对比餐厅的例子:
服务员手中空白的订单板 <=> 遥控器未编程的按钮插槽; 按顾客要求填写订单板 <=> 给遥控器按钮插槽设定指定命令; 服务员传递订单板给厨师,厨师按照订单板制作餐点 <=> 用户按下遥控器按钮,插槽对应命令被执行。
服务员和订单板都不在乎订单上具体点了什么,只要是「餐点」就好了; 遥控器不在乎按钮插槽里设定了什么,只要是可执行的「命令」就好了。
代码实现
 类图
类图
基本操作
「基本」:一个遥控器上仅一个按钮,一个按钮仅对应一个命令。
首先,声明命令的发出者遥控器类:
1
2
3
4
5
6
7
8
9
10
11
12
13
14
/**
* 命令的发出者【Invoker】
*/
class RemoteControl {
    constructor() {
        this.buttonSlot = null; // 遥控器上的可自定义的按钮插槽
    }
    setCommand(command) { // 定义插槽对应的命令
        this.buttonSlot = command;
    }
    pressButton() { // 按下按钮,调用命令
        this.buttonSlot.execute();
    }
}
然后,声明命令的执行者,灯类:
1
2
3
4
5
6
7
8
9
10
/**
* 命令的执行者【Receiver】
*/
class Light {
    constructor() {}
    on() {
        console.log('Light on. ');
    }
    // ... 其他 api 略
}
最后是重点,命令接口和命令实例对象:
1
2
3
4
5
6
7
8
9
10
11
12
13
14
15
16
17
18
19
20
21
22
23
24
25
26
27
28
29
/**
* 命令模式的核心
*
* 命令接口【Command <<interface>>】
*/
class Command {
    constructor() {
        // 这里会保存指向命令执行者的数据成员
    }
    execute() {// 命令发出者和执行者解耦的关键
        // 这里执行命令执行者的执行函数
    }
}
/**
* 命令模式的核心
*
* 开灯命令对象【ConcreteCommand】
* 命令中封装了命令的执行者和执行者可执行的操作接口
* 无论命令调用者是什么,只要拿到这个操作接口就能发出命令
*/
class LightOnCommand extends Command {
    constructor(light) {
        super();
        this.light = light; // 命令的执行者
    }
    execute() {
        this.light.on(); // 调用命令执行者的执行接口
    }
}
如何使用呢?
1
2
3
4
5
6
7
8
9
10
11
12
/**
* 如何使用?下面是 Client 的操作:
*/
// 用户获得一个遥控器,确定命令对象
let remote = new RemoteControl();
let light = new Light();
let lightOn = new LightOnCommand(light);

// 用户将遥控器插槽编程为开灯命令
remote.setCommand(lightOn);
// 用户按下遥控器按钮,执行开灯命令
remote.pressButton();
执行结果:
1
Light on.
扩展多个按钮
假设遥控器有多个按钮插槽?
把遥控器类的插槽改为数组,再给它的成员函数们加上参数:
1
2
3
4
5
6
7
8
9
10
11
class RemoteControl{
    constructor(){
        this.buttonSlots = [];
    }
    setCommand(slotIndex, command){
        this.buttonSlots[slotIndex] = command;
    };
    pressButton(slotIndex){
        this.buttonSlots[slotIndex].execute();
    };
}
假设按钮数量过多,有部分按钮没有被设定命令?
设置一个「无命令」对象(类似于策略模式 中「不能飞」),空命令的按钮插槽填充「无命令」对象:
1
2
3
4
5
6
7
8
class NoCommand extends Command{
    constructor(){
        super();
    }
    execute(){
        console.log('No command. ');
    }
}
类似于链表的虚拟头结点 dummyHead,避免多余的边界判断。HF 教材上把这个方法称为「空对象 null object」。
撤销操作
针对每个命令对象,增加一个当前命令操作 execute() 的「撤销操作 undo()」。
比如,LightOnCommand 开灯对应的撤销操作是关灯,LightOffCommand 关灯对应的撤销操作是开灯:
1
2
3
4
5
6
7
8
9
10
11
12
13
14
15
16
17
18
19
20
21
22
23
24
25
26
27
28
29
30
31
32
33
34
35
class Light {
    constructor() {}
    on() {
        console.log('Light on. ');
    }
    off() {
        console.log('Light off. ')
    }
    // ...其他 api 略
}
// ...Command 声明略
class LightOnCommand extends Command {
    constructor(light) {
        super();
        this.light = light;
    }
    execute() {
        this.light.on();
    }
    undo(){
        this.light.off();
    }
}
class LightOffCommand extends Command {
    constructor(light) {
        super();
        this.light = light;
    }
    execute() {
        this.light.off();
    }
    undo(){
        this.light.on();
    }
}
针对每一个命令对象,编辑相应的撤销操作函数,需要时调用 undo()。
但当我们按下操作键时,显然需要知道上一步操作的是那个命令。于是自然想到需要在命令发出者 RemoteControl 类中添加一个数据成员记录「上一步操作命令」:
1
2
3
4
5
6
7
8
9
class RemoteControl{
    constructor(){
        this.buttonSlots = null;
        this.lastCommand = null;
    }
    pressUndoButton(){
        this.lastCommand.undo();
    }
}
这是简易实现。实际应用中,通常能按照命令执行顺序由时间从近到远撤销一系列命令。先进后出,可以用栈:
1
2
3
4
5
6
7
8
9
10
class RemoteControl{
    constructor(){
        this.buttonSlots = null;
        this.lastCommandStack = []; // 扩展为命令栈序列
    }
    pressUndoButton(){
        let lastCommand = this.lastCommandStack.pop();
        lastCommand.undo();
    }
}
以上只是粗糙代码,没考虑空栈等一系列问题。空栈的话直接把 lastCommand 赋值为 NoCommand 执行无命令操作就 ok。
宏命令
宏命令,与微命令相对,就是一系列微命令组合成的命令集合。
按下一个微命令按钮(e.g. 开灯),执行单个命令(e.g. 开灯);按下一个宏命令按钮,按顺序执行多个微命令序列(e.g. 开卧室灯 -> 开客厅灯 -> 打开空调 -> …)。
如何做到这一点?设计一个新类?不需要。
直接继承 Command 接口,实现一个宏命令类:
1
2
3
4
5
6
7
8
9
10
11
12
13
14
15
/**
 * 扩展:宏命令类
 */
class MacroCommand extends Command {
    constructor(commands) {
        super();
        this.commands = commands; // 一组微命令
    }
    execute() {
        // 按顺序执行微命令
        for (let command of this.commands) {
            command.execute();
        }
    }
}
使用宏命令(为了简单起见,遥控器使用的仍是基础的只有一个按钮的版本):
首先,添加两个新设备,空调和卧室灯:
1
2
3
4
5
6
7
8
9
10
11
12
13
14
15
/**
 * 使用宏命令操作
 */
class AirConditioning {
    constructor() {}
    on() {
        console.log('Air-conditioning on. ');
    }
}
class BedroomLight {
    constructor() {}
    on() {
        console.log('Bedroom light on. ');
    }
}
然后,给两个新设备分别增加一个开启命令:
1
2
3
4
5
6
7
8
9
10
11
12
13
14
15
16
17
18
class BedroomLightOn extends Command {
    constructor(light) {
        super();
        this.light = light;
    }
    execute() {
        this.light.on();
    }
}
class AirConditioningOn extends Command {
    constructor(machine) {
        super();
        this.machine = machine;
    }
    execute() {
        this.machine.on();
    }
}
使用方式:
1
2
3
4
5
6
7
8
9
10
11
12
13
14
15
16
// 遥控器
let remoteWithMarcoCommand = new RemoteControl();
// 设备列表
let myAirConditioning = new AirConditioning();
let myBedroomLight = new BedroomLight();

// 命令列表
let airConditioningOn = new AirConditioningOn(myAirConditioning);
let bedroomLightOn = new BedroomLightOn(myBedroomLight);

// 初始化宏命令组:开空调 -> 开卧室灯
let commands = [airConditioningOn, bedroomLightOn];
let welcomeHomeCommands = new MacroCommand(commands);

remoteWithMarcoCommand.setCommand(welcomeHomeCommands);
remoteWithMarcoCommand.pressButton(); // 按下按钮,执行宏命令
执行结果:
1
2
Air-conditioning on.
Bedroom light on.
宏命令的撤销操作不难,直接倒着执行 commands 的 undo()(《Head First》按正序执行 undo,我觉得应当倒序,问题不大):
1
2
3
4
5
6
undo() {
    // 倒序撤销微命令
    for (let i = this.commands.length - 1; i >= 0; i--) {
        this.commands[i].undo();
    }
}
现实应用
- 队列请求。比如 Web 服务器的网络请求,维护一个请求队列,服务器只负责执行每个请求的
execute()函数,不关心请求具体的执行者和执行方法。 - 日志请求。文档、数据库的操作日志记录,方便回撤操作,可以使用命令模式封装操作。
参考资料
- Youtube: command pattern
- 《Head First 设计模式》第六章